| | TSNE Tutorial |  |
|
|
| Author | Message |
|---|
Guest
Guest
| Subject: TSNE Tutorial  Wed Aug 05, 2009 1:27 am Wed Aug 05, 2009 1:27 am | |
| So I did a little math there for arguements sake just to see how my team sneaking stats are looking these days. The two main characters I played TSNE with almost exclusively are Karaoke and ToFu. The combined tally looks like this -
Total time playing Team Sneaking - 336 hours
Total kills - 3156
Total deaths - 1689
Total stuns - 3199
Total stuns received - 882
I hope these figures help you to trust me when it comes to my approach in this tutorial lol. Well TSNE is a mode where the better team won't always win, there's a definite luck element involved that makes a wide gaping difference from pretty much any other mode where fast headshots and good defence win out. This mode is really about being in the right place at the right time, picking off a target carefully and getting out of there. For my money sneaking is far more difficult than defending and the main reason is because people rush their guts out without taking their teammates position into consideration. By this effect I think the way you start the round determines how it's going to play out and so in this thread I'll go map by map and relay what's worked for me when the round starts. Your position on the map as a sneaker is everything. Skill sets are important yes and relying on them gets you the kills, but a kill doesn't mean much if there are three other enemies behind as you stick that blade in. If you can't stay invisible at least stay evasive. In my next post I'll cover M.M, include some pics and hope you can take some of my ideas on board! |
|
| | |
SonicFox-

Messages : 479
Date d'inscription : 2009-07-13
Age : 102
Localisation : Glasgow/Scotland/Griffon/MGO/OTHER FORUM :)
| | Subject: Re: TSNE Tutorial Wed Aug 05, 2009 1:42 am | |
| | |
|
| | |
Guest
Guest
| | Subject: Re: TSNE Tutorial Wed Aug 05, 2009 2:34 am | |
| M.M for Sneaking. Almost certainly the best map for people who like using mags. Lots of sneakers gun for the house in the middle right away but in my opinion it's quite a deathtrap with random nades flying up the stairs and people gaining easy headshots from simply shooting the stairs on the way up. From your spawn point there are surely better places to hide than in the house...here's a few.  An excellent spot to sit back and wait for the enemies grenade supply to run dry. It might be the end of the map and give you the impression that you're boxed in but you have the whole section on the left cross to use for cover. Some people have a habit of grenading this exact spot but often launch it short. Even when they come in and fire on the ground behind the sandbags you have space behind it (right cross)...salute and your knife vanishes. I've stood there plenty of times saluting and had the enemy simply wander off after finding nothing on the whole left side.  Mags blend in really well here and planting them on both sides of the sandbags often catches people who roll in from in front of you. the cross at the top refers to the truck...a good spot to stop at on startup before heading down further..it's important to wait here if you get here early..chances are some nades will have hit your team on the other side and you will need to take a breather until stealth powers up again otherwise you're likely to die from fire on the left side.   Without doubt the most overlooked box in the whole map and yet barely anyone camps here at startup while your team dashes forward. There will be a box here on ocassion you can remove. It blends in well to the crates and there's a wall on the right side of it you can hug to obscure yourself from oncoming enemy view. The three crosses represent places sneakers typically camp...not bad places but enemies have a tendency to fire all over these shadowy parts and skip right past this 'empty' box. 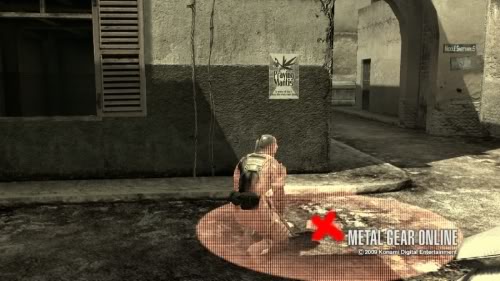 If you have Runner 2 on this a great spot to mag at the start, giving you just enough time to jump through the window or lay down beside it. It blends in really well with the floor pattern here and has trapped in twos and threes from time to time for me.  A good camping spot overall, the alley with the cross is a great place to spam stun nades and take shots from. If a nade flies up it's a simple roll to the ground and if an enemy takes the ladder it's basically a free kill.  Another hugely overlooked hiding spot for startup that no one EVER checks. As your team fans out you can hop right in here and wait for the sound of feet to scatter past you..even better if someone launches an e. locater as you can see them through the bin and on radar so getting back out isn't a big risk. Alot of my TSNE experience comes from free battle, where your team does whatever the hell it wants to - there's a feeling that people are out for themselves rather than the partners you have...as such this is why the sneakers in there tend to die...ALOT. Coupling up on this map is definitely beneficial even if there's a risk of two deaths rather that one. The rest of the round can be a random mess, but camping at some of these spots and simply waiting for the other team to run into your space often affords you an advantage over them seeing your dust clouds all over the place and going Rambo on you. I'll do the defense side of M.M on my next post. |
|
| | |
SonicFox-
Messages : 479
Date d'inscription : 2009-07-13
Age : 102
Localisation : Glasgow/Scotland/Griffon/MGO/OTHER FORUM :)
| | Subject: Re: TSNE Tutorial Wed Aug 05, 2009 2:42 am | |
| I tend to rush as i play it on free battle. If i hide my team get caught and i am spotted it spoils it for me so i rush now take ga ko or kerotan as they are never defended at the start an go for a wee sit about. M.M is good for that.
Taking it and hiding.
Nice work though hope to see what else you will be posting. | |
|
| | |
Guest
Guest
| | Subject: Re: TSNE Tutorial Wed Aug 05, 2009 2:45 am | |
| Yeah but in free battle alot of people kick you out for rushing targets lol if we could get them and get to base safely I'd do it all the time...but playing like that makes me rarely (if ever) go for the targets. |
|
| | |
SonicFox-
Messages : 479
Date d'inscription : 2009-07-13
Age : 102
Localisation : Glasgow/Scotland/Griffon/MGO/OTHER FORUM :)
| | Subject: Re: TSNE Tutorial Wed Aug 05, 2009 2:50 am | |
| I get it to the base often and if they defend properly from the start well..... they can't rush.
If people defended on free battle mabye i would take my time and think about what i could do. | |
|
| | |
Guest
Guest
| | Subject: Re: TSNE Tutorial Wed Aug 05, 2009 6:09 am | |
| That's why I made this thread, because we're a team who can collaborate and not free battle randoms lol. Defense on M.M. When it comes to zoning on this map it's a good idea to have at least Runner 1 set as that little extra foot speed really helps you catch people early in the initial clinch. On startup there are 4 main areas you should be looking to get control of quickly.  I figure most people should know about this one, getting to te back window of the house fast and chucking in a couple of grenades to catch enemies who are trying to scamper upstairs. At the point of throwing grenades you may also be met with stun or smoke grenades from the other end or from your right hand side around the corner. After throwing it's a good idea to box pop and prepare to jump through and attack if you hit one. 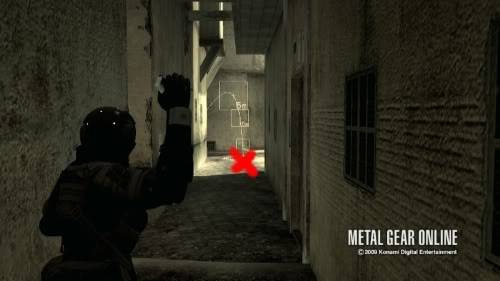 Having at least one person take the right alcove at the start is also worthwhile. Regardles of how fast the enemy gets there you will reach it first and so you have time to prepare a grenade and catch a glimpse of the shadow heading right into the shade. If you feel like they're going to get right into the corner travel just beyond the alley on your left and bounce it off the left wall.  What works for you will work for the enemy as well so it's a good idea to clear the area around the corner before heading forward. I also suggest you avoid rolling in the front window because it's all too often littered with mags as wel as the door on the left. The cross marked higher on the picture refers to the crates which people use for cover alot...remember you can shoot through them so fire on them from top to bottom before moving forward.  As I noted earlier when firing grenades into the house window some people have a habit of coming directly around the corner from the right throw nades or mk2 you so keep an eye on your right hand side after throwing one in. If they're not right there tag the van across from you and pay particular attention to the red line and alley because some sneakers make it a point to get behind you as soon as possible. You'll notice the dust clouds here and the majority of them dash into the alley.  A well timed grenade in through the window often heralds good results, it's especially effective against enemies who use the crate up top to stand and shoot on - if they're fired upon and jump back inside the nade will at least made a dent in their health. Unless our team lands a scan I think it's almost always a bad idea to charge inside the house when on defense since the stairway is so narrow and the results are chaotic because it's a hiding hot spot. If they're going to spend 5 minutes camping in there then they won't win anyway, you have to make them bend to your patience and force them out. Hope that's some food for thought.  |
|
| | |
Guest
Guest
| | Subject: Re: TSNE Tutorial Wed Aug 05, 2009 7:16 pm | |
| Awesome work Kara! Cheers all the way! I suggest everyone study those patterns carefully  |
|
| | |
Guest
Guest
| | Subject: Re: TSNE Tutorial Wed Aug 05, 2009 8:27 pm | |
| Thanks I'll try and cover U.U later tonight. |
|
| | |
SonicFox-
Messages : 479
Date d'inscription : 2009-07-13
Age : 102
Localisation : Glasgow/Scotland/Griffon/MGO/OTHER FORUM :)
| | Subject: Re: TSNE Tutorial Wed Aug 05, 2009 9:39 pm | |
| U.U is the only place i like to play tsne. All the other places suck for it. | |
|
| | |
Guest
Guest
| | Subject: Re: TSNE Tutorial Wed Aug 05, 2009 11:16 pm | |
| Only if you suck at it lol. I don't like U.U much because of the roof element...an annoying camping spot for the enemy and a hassle getting the target to the goal up there. |
|
| | |
SonicFox-
Messages : 479
Date d'inscription : 2009-07-13
Age : 102
Localisation : Glasgow/Scotland/Griffon/MGO/OTHER FORUM :)
| | Subject: Re: TSNE Tutorial Thu Aug 06, 2009 12:26 am | |
| I prefer it because the roof.
Well mabye i can rush easier there.
I always do good in U.U tsne so i like it there. | |
|
| | |
Guest
Guest
| | Subject: Re: TSNE Tutorial Thu Aug 06, 2009 4:30 am | |
| Next up U.U. Since both bases are so close on this one there's a real emphasis on making the right move from startup - But this is map is generally kinder to sneakers than A.A or B.B because you have a wider choice of places to hide from your spawn point. All the same once one is exposed it becomes a mad dash to reach a roof or the target. Here's some reliable positions that will keep you safe while the enemy come dashing in all guns blazing.  Definitely my favourite go-to point at the start of the round, lay down by the bin here in the grass and you have yourself excellent camouflage regardless of your camo...very difficult to spot people here and provided you stay still you'll have a decent view of the area through the grass. As soon as you reach the area an e.loc up top will let you know how many are coming down. Random grenades tend to be thrown in the corner opposite and near the vent on the other side.  Another nearby reliable place to lay low. Remember you need to be facing completely straight when you lay down otherwise you'll automatically pop back up again. The vent in front can be good at times but the problem is that if there is someone at the other end waiting for you there's simply no way you can dodge the bullets...use with caution if you fancy it. 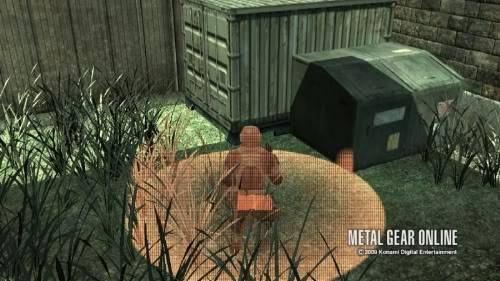 Yep magging anywhere in this region brings pretty good results since the enemy comes in from above and rarely pays attention to the ground below...you can mag the two platforms above as well though at startup you won't have much time to clear much distance after doing so.  Overlooked much? Right at the start you have yourself a spot where you can keep quiet until the grenade barrage is over. The mistake people make is heading to the opposite end right away when really all you have to do is crawl to the midway point - grenades can't reach you here from either end and defending players rarely run the risk of being tranq'd by poking their head in either end - at most expect them to shoot the nearby drums and leave.  This is really a three part idea that I haven't seen anyone use to any great effect - except me lol. Again through this whole post I'm assuming you're using at least Runner 1 to make use of timing. At startup you can get to this point and hug the wall...then come the grenades down the stairs which will miss by a mile. Going beyond this point isn't really an option because by the time you setup here the you'll see at least a couple of enemies at the middle cross section - chances are one will head up the back way..some go for the stairs or follow the line down and head up towards the intersection. Now the choice is yours on what to do...though each move involves heading forward.  Once the path is clear you can either aim down the intersection and fire off some rounds at the enemies charging in the opposite direction or..  You have plenty of time to catch enemies going up the ladder here...the time it takes them to get up you can either Mk2 them or ko them with 2 stun nades which are practically guaranteed to hit since they're only moving vertically. Alternatively..   You can run ahead and grab the drum can here then take cover behind the bin or head up the stairs...by the time you reach the top you should stop running and tiptoe your way around to this point. From startup chances are you'll find an enemy camping here who's to busy checking down the stairs to notice you creeping up behind him...easy kill. Mags around this area are also particularly good - each platform and definitely beside the ejector seat uhh..thing lol. On defence this is a good place to camp as well just like the enemy would...just make sure no one sneaks up behind you.  I don't recommend standing and shooting your mk2 from a mile away...much time is wasted trying to hit targets with a rubbish fire rate...but if you do want a good spot outside the roofs this is - easy means of escape if you're spotted and you have the whole ledge to move along if you want target guarders down. The cross mark is a great place to set yourself in your box...it rarely draws attention because there usually is one here anyway.  If you do take the left path at startup (I don't recommend it as highly as the left at al) getting yourself up to this point rather than the stairs at the far end is pretty safe but you should expect company as soon as you reach it from the other side. Mags work well all over this grassy area and you've got the gap blow to slink under if need be. I'll explain why I think the roof is probably the worst place to head for when sneaking when I do the defense side of U.U later. |
|
| | |
guderian

Messages : 25
Date d'inscription : 2009-04-17
| | Subject: Re: TSNE Tutorial Thu Aug 06, 2009 12:57 pm | |
| very very usefull that's a tactic lesson wd kara:-p! | |
|
| | |
Ade

Messages : 133
Date d'inscription : 2009-04-14
| | Subject: Re: TSNE Tutorial Thu Aug 06, 2009 3:25 pm | |
| very usefull since my worst mode is tsne | |
|
| | |
En-Crypted

Messages : 200
Date d'inscription : 2009-07-13
| | Subject: Re: TSNE Tutorial Thu Aug 06, 2009 3:30 pm | |
| Thanks Kara, lets just hope we don't get those 'Pray and Spray' opponents on TSNE, com'on you know the type? The type were you are hidden in an awesome place and have come to the conclusion that nobody knows where you are; but then.......... BOO-YAAA!! a bullet flys out of nowhere and hits you, lighting you and all your team-mates up like a Christmas tree on Christmas Eve.  | |
|
| | |
Guest
Guest
| | Subject: Re: TSNE Tutorial Thu Aug 06, 2009 7:00 pm | |
| Yeah I know the type lol that's why I think there's a real element of luck involved in tsne...it's the only mode where randomly shooting the floor will earn you headshots. Obviously I can't really guide you through the whole round but hopefully things I've pointed out will save you a few lives...quite a few lives lol. Here's a few tips on Defending on U.U that have also served me pretty well. 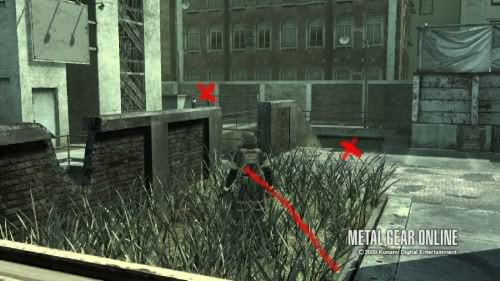 A startup most players come charging up the stairs, a couple of grendes down the stairs can work a treat when it comes to catching people who have spawned a few seconds late and are trying to reach the left side. However when you start heading forward do assume someone below is going to launch a smoke grenade up the way - enemies rarely take the chance of coming up to mk2 you when they hear you coughing but it does slow you down. Be sure to stick to the marked line into the left to avoid this unless you plan on taking a right in which case travel under the columns by the building to make sure you don't get caught. If you start late you can come forward and send a grenade over the fence where the top cross is marked - a good place to catch people who come up the ladder and dont venture outside that area.  As a sneaker the roof is one of the worst places you want to be at the start of the round - everyone's wise to it and you'll often find yourself being blown right off the top. When defending as soon as you reach the top pay attention to the opposite end and fully expect to be met with either mk2 shots or a smoke grenade right away. Chances are they'll fire a smoke grenade from the other side as well so you want to run int the middle section right away. The odd time a sneaker will be directly at the corner on the right so perform a roll and hit the ground afterwards just in case. You may spot a sneaker making their way from the middle set of ladders and running up the back end but the majority of them stick to the opposite side - hopefully you hav a partner with you so each of you can fire a grenade up each side as it often brings good results. 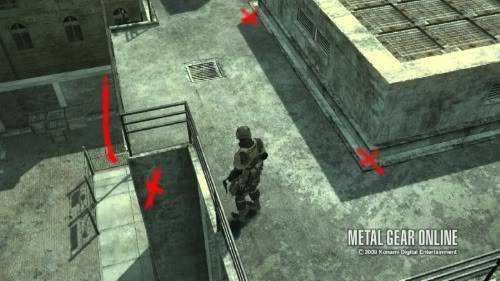 When you do reach the other end be aware that people tend to plant mags directly on the double crossed surface area, they're difficult to spot so stay to the outside as you come around to be safe. so hang around this area for just a bit until someone knocks stealth off the enemy to see if any you haven't hit with grenades are hanging off te sides of the building - you can't hit them with your rifle at this point but you can let them drain their stamina and either force them into coming up or taking half their life by droping below.  After I come off the roof I always head down here to camp, for the patient defender this is an EXCELLENT place to catch a sneaker. Some people are aware of this spot but most of them still casually run up the stairs and right into a variety of cqc predicaments. You may have to wait a little before one shows up but trust me they almost always do - you can see them coming from as far away as the cross on the other side and from any direction. The only time you're really in any danger here is if there's a sneaker on the roof who flips off...rarely happens but every once in a while they'll mk2 you from the ledge above so just keep an eye on the back of your head and ocassionaly check the alley on your left. Looks like I'm missing a few pics..I'll edit in a few other areas later. |
|
| | |
Guest
Guest
| | Subject: Re: TSNE Tutorial Fri Aug 07, 2009 1:03 am | |
| So to continue with defending on U.U...  If at startup you decide to take the right side and avoid the ladders and underground area, instead of charging below into a spot with plenty of hiding spots - simply get to this spot and sit still. Enemies expect you to come charging in and if you leave the top platform all quiet it's easy to catch an anxious sneaker who takes the ladder or platforms up...you'll see the shadow right away and can take an easy kill. 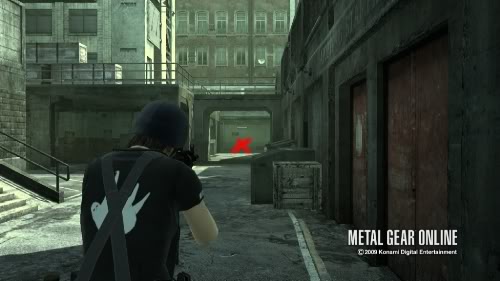 If you're using Runner 2 and choose to head straight along from your base once you get around the corner, you have a decent amount of time to tag the wall at the far end...sometimes sneakers move back from grenades and leave themselves open to shots underneath - coupled with mono this is a good way to apply early pressure.  Again if you're using Runner 2 and decide to make your way up the stairs and around the corner, the foot speed you have lets you meet sneakers who dash up the middle stairs halfway - you can stand at the corner and wait for the dust clouds or immediately toss a grenade - anytime they get hit here they tend to land on the railing and fall off it so it's a fairly simple kill on a static enemy.  If you've dashed all the way around this side make sure these stairs are mag free and fire down the narrow platform, you'll be surprised how often people run and hide along it. Likewise Runner 2 affords you the time to at the very least clip enemies who are heading for the vent or stairs at the far end. 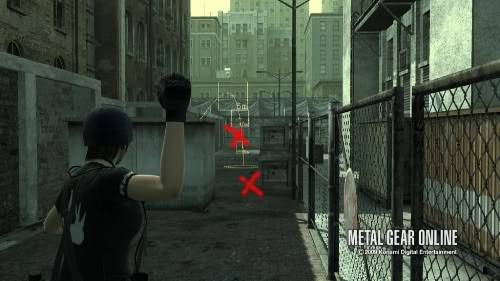 If you choose to head around to the back it's a good idea to clear this whole long straight..sneakers often wait at the very far end after your team has headed up their first set of stairs - mainly behind the fence and crates. There's also a box to the left of this view that exposed players often remove and place their own in so watch out for it by the crates. If you play too much TSNE your head turns into...  So be careful!!  Next up B.B. |
|
| | |
Guest
Guest
| | Subject: Re: TSNE Tutorial Fri Aug 07, 2009 1:06 am | |
| |
|
| | |
Sponsored content
| | Subject: Re: TSNE Tutorial | |
| |
|
| | |
| | TSNE Tutorial | |
|
